As the name suggests, the half Windsor is the smaller brother of the double Windsor. Although the knots are tied in similar fashion, the look and shape of the half Windsor is much smaller and more asymmetric. Below are our detailed instructions on the half Windsor tie knot.
Half Windsor knot Instructions:
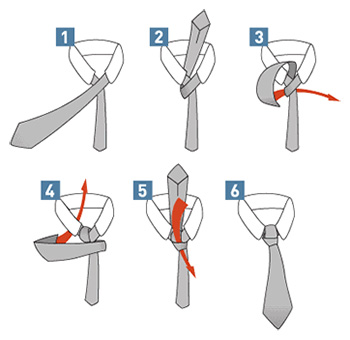
- Start the half Windsor knot by laying the tie around your neck with the wider end hanging lower than the narrow end. The stitching of the tie should be facing towards you.
- This and the next step are identical to the double Windsor. Wrap the wide end over the narrow end and through the loop at your neck.
- Wrap the wide end around part of the tie near your neck, and then back behind the narrow end that hangs down in front of you.
- Wrap the wide end around the narrow end but do not pull tight.
- Pull the wide end around the part of the tie that wraps around your neck as shown in picture #5. Then, pull the end of the tie through the loop on top of the knot.
- Pull the knot tight slowly and adjust the knot to your liking.
The Best Ties for the Half Windsor knot.
The half Windsor knot will look nice with most neckties. Especially very thick silk ties, those that would make the double Windsor too big, are perfect for the half Windsor knot. Best are fine foulard patterned ties, striped ties, and solids.
Matching the Half Windsor knot to Shirt and Suit:
The half Windsor is asymmetric in shape and medium in size. It looks best with medium spread as well as button down collars. For more information you may also want to read our tutorial on: Matching Ties